Somnium – Dream Transition

During our final course of spring 2017 at Uppsala University – Department of Game Design at Campus Gotland we’ve formed teams with about 4-7 members that will make a Game to be displayed at Gotland Game Conference at the end of the course. The restrictions for the game’s subject is a free choice but the content will only be a demo of the completed game, a vertical slice, a proof of concept. Thus, the demo will be fairly short but other than that the game could be anything we’ve ever dreamed about making. Funny enough, the concept of the game my team will develop is about dreams. A little girl’s dreams. A nightmare. The name of the game is Somnium and as our main character, a seven year old girl named Olivia , falls asleep she ventures into one of her nightmares and has to face the dangers it presents. Thankfully she has her cat plushy Leon at her side and by hugging him she will calm down at see the dream as more pleasant for a short time.
In short, it’s single player 3D atmospheric puzzle game that takes place in a child’s dreams.

This is  where our practical design choices start. How do we visualize the transition between nightmare and pleasant dream?

When the transition happens objects in one dream state will change to other objects in the next state. For example, a bear may become a rock, the entrance to a cave may become a big mouth with teeth, a tree may become.. a scary tree(?) and so on.

Our first prototype to achieve this effect was to try a fade out / fade in approach. As one object fades out another object will fade in and take it’s place. This idea was simple but as our prototype was finished  came up with the following results:

Fade out & Fade in
Pros
– Easy and fast to implement.
– Very modular as any object could essentially replace any another when performing a transition.
Cons
– Required double meshes and textures for every changing artifacts in the game which would mean a lot of work for our graphic artists.
– Unappealing results as the both changing meshes would halfway through the fading be visible and look messy and sloppy.
– The collision boxes of the two meshes would have to be similar in size to avoid the player or eventual NPC’s ending up inside the models.

The prototype was fairly quick to produce but was discarded almost as fast. The unappealing visuals being an important factor. There might have been more pros and cons that were stated here and probably easy fixes to make it look and feel less cheap but alas this prototype was put on in a well hidden folder and will probably never see the light any time soon.

Stay tuned for next iteration of the dream transition in the game Somnium!

Somnium – Dream Transition

Week 6, Pause Function

This weeks topic might be a simple and boring one since it’s only about the pause function of our game. However, I figured there might be some solutions to how things were done that might be a tad interesting so bare with me for a bit.

A pause function is probably not necessary in such a small game like ours but it’s mainly there to not force the player to die if in need of a unplanned toilet break or just need time to rest and regain some focus. This is how I solved it.
The update function in our game state class which you could say takes care of the in-game-loop is quite slimmed down and basically just calls for all our game’s different managers. This allowed me to easily implement a boolean check before running the mentioned updates.
If this pause bool was FALSE: run the updates.
If the pause bool was TRUE: don’t run the updates and instead present the pause menu on top of the game area. The pause menu only covered a smaller part of the game screen so I also added a grey rectangle with low opacity to give a greater sense of that the game play was actually inactive.
The buttons for the pause menu was created with the help of a struct that held a text for the button and an integer to serve as the button index. Each button was created in a loop which looped through a set amount of times for as many buttons that was needed and added to a vector array. At the moment we only needed two buttons (a Continue and a Quit button) which may have made the loop a bit unnecessary but it will make the implementation of further buttons easier in the future.
Maybe I also should mention that these buttons wouldn’t be clickable with the mouse but only accessed with a keyboard. An integer in the game state class was compared to the index in of the respective buttons as the user pressed the up and down arrows and adjusted the color of the current matching value to show which button that was selected. It would then perform the assigned task to the specific value when the activate button was pressed which in this case would be the return key.
See, this wasn’t that boring at all, was it?
Thanks for reading!pausemenu

Week 6, Pause Function

week 5, Loading screen

As our game has grown larger and larger asset wise over the weeks I guess it’s not that surprising that there might be a great amount of data that needs to be loaded for the game to start. This could of course have been handled differently than we did but we chose to load every game texture as the game starts, in comparison to load everything as it is needed. This is also a viable way to do it as the game only has one level and is rather small. If the game would have had multiple levels I guess we should at least have loaded only the needed textures and sounds for the current level that was playing.
The reason for a loading screen was because of some of the textures (e.g. the level background textures) was too large. This made the game freeze as the player pressed “Play” in the start menu and he would have to wait for about 10 seconds for the game to actually start. We figured that if you got to see the process of assets being loaded this wouldn’t give the player a reason to reach for the exit button in the top right corner too quickly.

Anyways, between the menu scene and the game scene we added our new loading scene. Before this we also added a texture cache class which would store all the needed textures for the game with a load- and a get texture function. The loading screen does the actual loading call for each texture to the cache class which may later be used in the game. It also loads in every sound needed through the sound manager which stores them for later use.

Once the loading screen is displayed on the screen we wanted, as mentioned, something for the user to visually see assets being loaded and as for now this is represented by two growing bars in the middle of the screen. One for textures and one for sounds. To make these grow we added two integers to the loading scene which we added a value to in between each loaded item. This might most definitively be changed to a more fitting way to represent process and growth which are more relatable to the game.

To make this feature work we used something called multi threading. (Be gentle with me from now on since my experience on this matter is below beginner level.) Anyhow, multi threading allowed us to do the loading process separately form the main process. Why? Because else we would have needed to call the draw function in between each loaded item as well as the integer additions. Now the main process only needed to keep track of those integers, scale the bars sprites accordingly and of course draw them to the window surface while the other thread loaded in the assets to its handlers.

loading

week 5, Loading screen

Code Review of Team 4

The first smart thing that got me was the clean start of the player class’ update function. Specifically the way of dividing the different states into their own functions which would be called by the value of an enumerator.
I also like the way that the player class seems to have control of the player dependent objects creation such as the harpoon, the golden harpoon and fish food. This is most likely how I, myself would’ve done it to keep track on what the player class can “access”, but I know many who would like to divide up most of this class into smaller ones. Dividing up the code into separate classes would probably make it more readable if you wanted to (for example) change something specifically related to the harpoon.
What you could’ve done differently, I guess, is have some sort of player manager class which would serve as the glue for each player related component keeping the player class at a minimum of only specific player related data. Even the controls could be in a separate class as well as the states. This would perhaps also prevent people from working on the same files making merging a tad less complicated.
However, to me, this would be an easier solution since my own programming skills are yet a bit limited and your way would give me a better overview of the player and it’s related classes, plus it seems fairly well organized.
Some comments would help making the code easier to get in to, if not for other team members, for an outsider like

Code Review of Team 4

Week 4, Natural Disaster: Tsunami

With a game concept like Datepocalypse, where a big pile of chaos should serve as one of the main flavors of the game, some of the hardships comes in the form natural disasters and this week I’ve been working on one that we call the Tsunami. As other games may give the player a screen sweeper, to clear all enemies from the play area, this game has this “enemy” which basically does the same thing but at the same time might be dangerous for the player as well. Plus, the player have no control over it’s activation.

As mentioned the tsunami functions as a type of enemy and is created and spawned in a similar way as other obstacles through the wave manager but has some key differences. It has a huge rectangular hit box that covers the entire game area from left to right and a height of about the same as a player avatar. This because if the player gets hit by the tsunami it will get past the player without continuously doing damage to the avatar for the entire tsunami duration but only on first impact. This could of course be done with a smaller height but for now with the tsunami’s current speed this felt like a simple solution to avoid the player avatar being missed and not affected at all. However, the player can protect both his avatars from taking damage by connecting the them thus activating the player shield. The actual sprite for the wave is however about the size of two game screens. As the wave is so huge and would completely cover the avatars we made it slightly transparent so that the player wouldn’t lose track of their positions.
A really big wave should affect every object it touches in some way, that’s why it also kills / pushes all still active normal enemies off the screen as well, which makes it similar to a screen sweeper. The enemies won’t actually try to avoid being hit but this is a necessity for the player which might not be so easy since the wave moves much faster than other obstacles. That’s why we added a second animation for the tsunami consisted of big, red, flashing warning triangles in the top of the screen to signal the incoming of something big and dangerous which played a few seconds before the actual wave would enter. We figured the triangles wouldn’t be enough so we also added a loud warning sound similar to the one used in real warnings for tsunamis, earthquakes or war to amplify that it might be a good idea to prepare the player shield.

There are still some bugs with the tsunami such as the collision between itself and the player where sometimes it would get stuck on the avatars pressing them continuously downwards and in the end hold them pressed against the bottom of the screen but this could be fixed by moving either the avatar past the wave hit box on impact or temporarily deactivate either of the collision bodies (preferably the avatar’s bodies to avoid enemies slipping through the wave as well).Animation

Week 4, Natural Disaster: Tsunami

Week 3, Player Shield

An important feature in our game, Datepocalypse, is the ability for the player to protect herself from all sources of incoming damage, be it enemies, enemy projectiles or natural disasters. Not only is it important because of the obvious fact that the enemies will try to kill the avatars but rather because controlling two avatars at once can be tough as it is. The shield would give the player some time to adjust her motor skills as well as giving her “a chance to breath”.

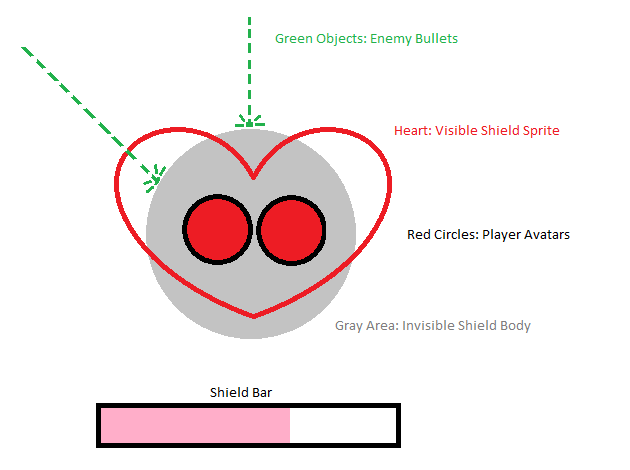
The shield activates as the two avatars get close to (or even collide with) each other and got it’s creation coordinates from the avatar on the left side, forming an invisible circular body around the two avatars, and using the game’s collision manager this was a fairly manageable task. A small problem we had the start was that the shield also collided with the avatars making it bounce around uncontrollably at times. This was solved by excluding the avatars collision check with the body. To visualize the shield we gave it a heart shaped sprite that neatly framed the two avatars.

To represent the shield’s health we added a timer for the shield to keep track on, which steadily decreased over time (with a time to live of 10 seconds). As the timer reached 0 the shield was deactivated and the player needed to part the avatars to make the shield recharge again. The player could of course deactivate the shield at any time by moving the avatars away form each other. The timer, or the shield’s health, was a necessity to avoid that the player kept using the shield at all times which would make the game too easy and boring. It should also make the player move around a bit more in the game area. As the shield was hit by enemy projectiles it’s health would drop a set amount (1 second) making it a bit riskier to try to outlast a bullet storm from the enemies as once the shield was gone the avatars would immediately be exposed to the incoming bullets. Sadly, we decided that the projectiles that hit the shield should be deleted on the spot rather than our original thought was to make them bounce off shield which may have given the shield feature a more epic feeling. This decision was partially based on time pressure to finish the game within our schedule but also on the limit of coding experience.

We also added a few conditions for the player as the shield was active. When active the avatars could no longer be able to shoot and they would also move around much slower.

Lastly we added a bar on the game’s Head-Up Display in the bottom center of the screen. The position was chosen based on that we figured that the player would likely keep her avatars (mostly) at the bottom of the screen to get a clearer view of incoming waves of enemies and thus shouldn’t have to look far to see if the shield was ready to use or not. The bar’s increase / decrease function was rather easily adjusted by just checking the shield’s timer.
blog shield

Week 3, Player Shield

Week 2, GameDev Projectile Manager / Enemy Shooting

This will be somewhat of a continuation on my last blog post about projectile management in our game project Datepocalypse. However, as the earlier subject was more focused on Player feedback when shooting this section will be about our game’s projectile making structure.

Earlier most code was in handled in our TestScene (or TestGameState if you will) and was rather unorganized and cluttered with poorly chosen variables and hard to read walls of text (of code).

As the next step for our project was to get the enemies to shoot some projectiles aswell we decided to try to clean up the code a bit before we continued.
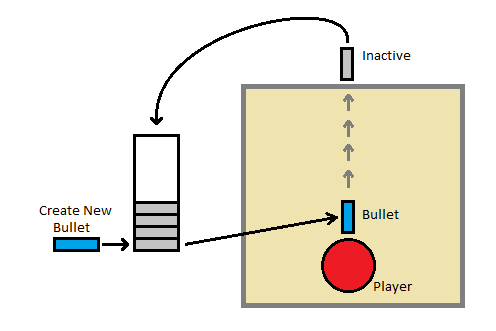
For starters the code handling projectile creation along with the reuse of old projectiles was moved to it’s own Projectile Manager. This manager will handle the creation, all the updates aswell as the draw function for each type of projectile not to mention keeping track of associated textures.

To use the actual manager we could simply create a pointer in our (for example) player or enemy class to an instance of the manager class and call it’s CreateProjectile function. This would first check if there was any unused projectiles (stored in the list of the desired projectiles) and if not crate a new one.

Next step was to make the enemy’s projectile class which was more or less exactly the same as the player’s projectile class apart from that the projectile were assigned another sprite and of course another direction. Since the similarities was so immense we had a discussion about if these actually should be separate classes or not. We stuck with the latter for the main reason that we’d have a better overview of the code as well as it’d be easier find unexpected bugs in the future.ProjectileManagerMockup


Moving on to the last part of this blog post, which will be the enemy’s shooting ability, where some unsolved issues still remain. The way we wanted it was to have the enemies aim for the closest player character (yes, there are two player characters as mentioned in the previous blog post) but this has not yet been implemented, mostly due to time restrictions and other priorities in the project. The shots should move in straight lines and we figured that we could use Pythagoras theorem to calculate which player character who was the closest to the shooting enemy. There were also some discussion about if the enemies should fire after a set time or when inside a specific range to a player character (or a combination of both). As for now this is controlled by a timer but will most likely be further looked into in the near future

Week 2, GameDev Projectile Manager / Enemy Shooting

Week 1, GameDev Player Shooting

In the making of my team’s space shooter project Datepocalypse I did a simple prototype of the two avatar’s shooting function. The reason for this specific artifact was mainly because it was a huge necessity for the main game play and probably also needed some time to “grow” as the game itself start to develop over time.
Starting off it was merely a matter of creating the projectiles at the avatar’s location and make them move in the desired direction. However, this resulted in hundreds (or even thousands) of useless projectiles allocating memory which never would be used again.

The Solution to this problem was to add each created projectile to a vector (or array) and as it left the visual screen it would be deactivated and added to the bottom of the list to be reused the next time a projectile was needed. This way there would be a quite low quantity of projectiles to keep track on for both of the avatars.

Moving on to the actual feel for the shooting mechanism, which was at this point very flat, some concerns appeared. The projectiles where just moving in straight lines and didn’t really give much feedback to the player and even though the bullets where flying at great speed it felt more or less: Boring!

The fix: Every fired projectile got a small spread in its direction and the player started to shake a bit left and right to give a sense of the player weapon being just a little bit to powerful for the avatar to hold steady. This felt good, but not great. The player needed more feedback.
Some testing with the shaking led to giving the player a little knock back to emphasize the weapon recoil. Also, lowering the player movement speed as he/she was shooting gave the firing ability a stronger illusion of the weapons power as more focus was drawn to firing rather than moving. To even further increase the power feeling I also added some minor screen shake at every shot.
At this point the feel for the main weapon prototype was nearly complete and even though the in-game graphics only consisted of place holding boxes with nothing to shoot at it actually started to feel “fun”.
The last small adjustment (and tip to anyone still reading) was to make the bullets larger. When making a seemingly powerful weapon, even if the weapon shoots tiny darts, and the screen is shaking and there is even a knock back from the weapon recoil, just try to make the bullets bigger. The difference may be night and day.

Thanks for reading!

blogg1

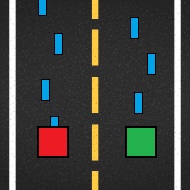
(Sadly, this image doesn’t really represent the final feel of the prototype. However it’s worth pointing out that the graphics wasn’t necessary to achieve the level of “fun” needed for this specific prototype)


Week 1, GameDev Player Shooting